by Paul Butler
illustrations by Marya Butler
By definition, the companionway is a stairway or passage that allows access to the interior of a boat from the deck or cockpit. It is traditionally composed of an opening through the vertical, or near vertical, cockpit bulkhead, extending forward through the deck or cabin top. This allows the person to walk down the companionway steps forward into the cabin with as little crouching and contortion as the size of the boat will allow. Because of the restricted space on small boats, the companionway and hatch often require special attention to design and construction.
These are major openings into a small hull. They must be lockable to keep out intruders, adjustable to deal with rain and spray, and easily and quickly opened for convenience or closed for safety, such as when a wave threatens to wash into the cockpit or over the deck. Sometimes these hatches have to provide ventilation and keep out bugs at the same time, which requires temporary or permanent screen or netting. They also provide light and a view from below.

Tapered Hatchboards
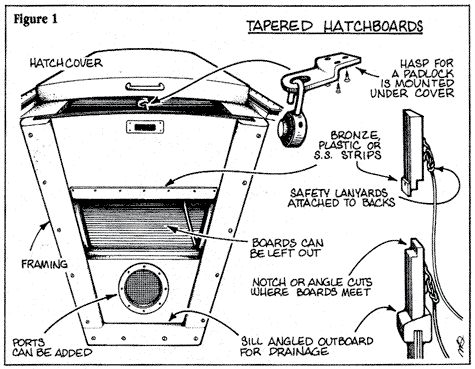
One traditional arrangement for companionway hatches is a tapered opening on the bulkhead, filled with one or more hatchboards, which can be removed individually for ventilation and visibility (Fig 1). The tapered design of the openingholds the remaining pieces in place. Tapered hatchboards are one of the best ways to provide a positive closure and a degree ofadjustability. They are inexpensive, simple, and easier to build than louvered or hinged doors.
For safety reasons, each hatchboard should be tethered to the boat; it's also wise to carry spares. We made a one-piece plywood spare for one of our boats, stowing it below for emergency use.

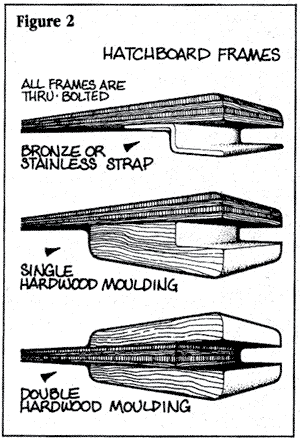
Hatchboards can be held in place by a variety of methods, from fancy mitered teak moldings to simple stainless or aluminum channel bolted to the bulkhead (Fig. 2). The moldings should be self draining, their bottoms left open or drilled with drain holes so water will not pool. If the boat requires, a step can be added. And if there is room, a hardwood sill can be fit across the bottom, angled outboard for drainage. After the bottom hatchboard is carefully fitted, its bottom edge is cut at the same angle as the sill (Fig 3).

The bottoms and tops of adjoining hatchboards should also be cut at a slight angle — we often use a 30-degree cut — to allow spray, rain, and dew to drain outboard instead of inside the hull. For additional water and wind protection and reinforcement) you may wish to add a strip of thin bronze or brass to the seam, always attaching the strip to the top hatchboard (Fig. 4). This will improve alignment on thin, wide hatchboards and is almost necessary on multiple plywood hatchboards. The need for such a reinforcing strip and the success of the bevel cut depend on the width and thickness of the board.

The hatchboards should be cut slightly overwidth and worked carefully into position, one at a time from bottom to lop, using a block plane. If you cut too much, the boards will rattle, or drop too far, but they should be loose enough not to stick in place. If you do cut off too much, you will have to cut a slice off the bottom and refit the sides, so leave some extra at the top of the topmost 'hatchboard and make the final top cut after each board is fit in place.
For hatchboards up to 30 inches wide, which is about the widest we usually build, 3/4-inch thick lumber is recommended. Voider openings may need a more complicated, hinged, double-door closure. We keep the opening size as small as possible in our own boats. Even an 18-inch top opening is usable if you learn to turn slightly sideways as you enter and exit. The bottom of the opening can be quite small since your feet usually go through one at a time. We try to keep the location of the hatch cutout as high above the deck or cockpit sole as practical to help prevent the boat from filling with water if the cockpit were flooded.
Quality plywood can also be used for hatchboards. It has the advantage of being stronger and much more stable over time than lumber, but the edges must be well sealed. We seal all plywood surfaces with three coats of epoxy and then paint. Thus treated, they almost never warp, unlike lumber, which may warp or even split as it is exposed to sunlight and water.
We often fit one or more plastic-framed Beckson opening ports into the hatchboards. They can be equipped with screens to keep bugs out and to provide ventilation and a look aft from below. These lightweight, simple-to-install, one-piece units are usually a welcome addition to a small hull. Even the smallest hatchboard has sufficient room fora small port.
Rails & Runners
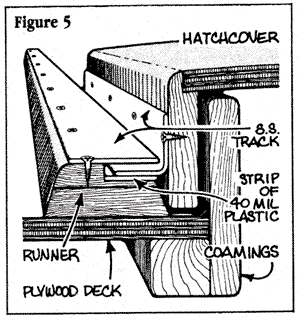
The deck or cabin top opening is usually closed by a hatchcover that slides on rails over the top of the vertical hatchboards to shed water (Fig. 5). A simple brass or stainless hasp, attached to the bottom of the sliding cover, provides the means for locking a hatch. When the cover is closed, the tab projects sufficiently through the top hatchboard to attach a padlock. There are other ways to secure a companionway hatch but none simpler to build or operate. If you wish to dress up the locking system a bit, you can flush fit a small square plate of matching brass around the hole in the hatchboard, giving it a traditional look.

A sliding cover that jams will drive you crazy until you tear it apart and correct the problem, so best build it right the first time around. Most important is to begin with proper alignment, and to provide the proper amount of clearance in all positions. The rails and runners that support the hatch sliding mechanism must be aligned parallel to each other to slide smoothly in all weather. Laminated, built-up runners, epoxy glued, are always more stable than a large single piece of lumber, and they may be built of small or even scrap pieces.
An additional secret to a slick working hatch is a strip of friction-reducing thick plastic; 40 mil or approximately 1/8 inch, on which the weight of the hatch slides rests. Such plastic is tough, long lasting, unaffected by saltwater, and works equally well in tropical sun or winter freeze.
The strip maybe pre-drilled, with flathead screws countersunk flush or just slightly below the surface. The sliding mechanism should be fitted snug so as not to rattle under any condition, but not so tight that it might ever bind as the wood and plastic swell or shrink.
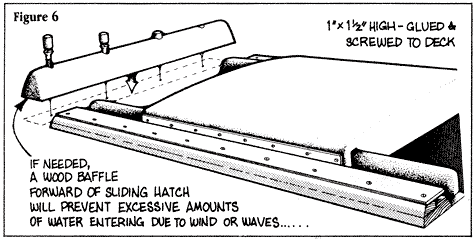
We prefer low-profile sliding hatchcovers built the same shape as the cabin or deck. There are a variety of types, but the simplest to build, if the cover does not require a shape to match the deck, is a flat cover of laminated or cold-molded plywood and epoxy. The same construction principles for the sliding mechanism can usually be applied to fiberglass, wood, and even metal sliding hatchcovers. Sometimes on small boats, wind will drive spray and wavetops over the deck and force water under the hatchcover, up and over the coamings, and into the cabin. If so, it may be necessary to fit baffles or small rails to the deck around the hatch {Fig. 6). If such baffles are used, provide drain holes in the comers or leave the corners open so water will not accumulate.

The sliding hatchcover should also be provided with some type of positive stop such as a hook to hold it in the open position. This will prevent the cover from suddenly sliding closed and injuring someone if the boat slams into a wave.
The next time you use your companionway, lake a close look at its design and construction. And remember that it is not merely a cabin entrance: It is vital to the security and livability of the boat itself.